
When is roasted garlic EVER a bad thing.... and when you start a "one dish wonder" with roasted garlic and chicken, you KNOW your in for a treat!

This classic comfort food chicken dish starts with roasted garlic, and this is how easy it is! Chop off the little pointy tip off of the whole garlic clove, drizzle with a little olive oil, salt and pepper, and pop it into a foil "pocket!

Close up that pocket of garlicky goodness, and pop it in a 375 degree oven.

Now, time for some chicken and couscous! I seasoned my bone-in chicken thighs with salt, pepper, garlic powder and thyme, and browned on both sides.

This took about 5 minutes on each side, and by no means will fully cook the chicken, but seals in all that super chickeny flavor and moist juicy goodness!

After browning the chicken, pull it out and drain the fat. I used a good old fashioned paper towel to soak up the fat and that was it!

Leave all the brown bits in the pan, that's all FLAVOR!
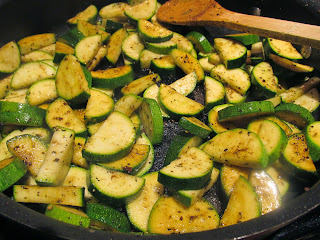
Using that same pan (as in "one dish wonder") add your chopped zucchini and get them browned up and started, about 3 minutes is all it takes.

Meanwhile, partially cook your couscous for about 4 minutes, and drain.

After you get some color on that zucchini, deglaze the pan with about a cup of white wine. Any white wine will due, the only rule is... if you wouldn't drink it, then don't cook with it.
I just added my "house" pino grigio, and it was fine! Now, scrape all those brown bits off the bottom of the pan. The wine will loosen it all up and add flavor.

Then, pop your partially cooked couscous in the pan with the zucchini and cook for about a minute or two, to combine... you know... get the party STARTED!! Add another 2 cups of chicken stock to the pan before adding the chicken thighs back in. This will give us moist, tender, tasty, garlicky chicken, and we will LOVE IT!!

Last, pop your browned up chicken thighs in the pan! Nestle them right in, snuggling them into the couscous and sauce, and zucchini!

Now, put on the lid (or top with foil) and pop it all into your 375 degree oven with your roasted garlic! Let it cook covered for 20 minutes.

I put a cookie sheet under the pan in case I have any spill-over. Now, don't forget about that roasting garlic... it's about to join this chicken party soon, and we will be so happy we invited her!!! After 20-25 minutes, pull both your chicken and your roasting garlic out of the oven.

The garlic will be beautifully roasted and smell buttery, and garlicky, and delicious. When cool enough to handle, simply squeeze ALL (yup all of 'em) those cloves of garlic into the chicken and couscous.

I used a fork to help, but if the garlic is cool, they will pop right out when you squeeze them.

Mix that garlicky goodness with all that couscous and chicken and juices! Now, pop back into the oven, uncovered, for another 10 minutes!
Now what this needs, is absolutely nothing, just a fork and a plate... but if you want to send it over the top, add a little toasted pine nuts!

Just a sprinkle, and you have some serious Sunday chicken dinner comfort food, fit for a kid!! Dinner Stevie's way...
 Sunday chicken dinner with all the comforty goodness of roasted garlic and creamy couscous and zucchini! Soooo good!
 When is roasted garlic EVER a bad thing.... and when you start a "one dish wonder" with roasted garlic and chicken, you KNOW your in for a treat!
 This classic comfort food chicken dish starts with roasted garlic, and this is how easy it is! Chop off the little pointy tip off of the whole garlic clove, drizzle with a little olive oil, salt and pepper, and pop it into a foil "pocket!
 Close up that pocket of garlicky goodness, and pop it in a 375 degree oven.
 Now, time for some chicken and couscous! I seasoned my bone-in chicken thighs with salt, pepper, garlic powder and thyme, and browned on both sides.
 This took about 5 minutes on each side, and by no means will fully cook the chicken, but seals in all that super chickeny flavor and moist juicy goodness!
 After browning the chicken, pull it out and drain the fat. I used a good old fashioned paper towel to soak up the fat and that was it!
 Leave all the brown bits in the pan, that's all FLAVOR!
 Using that same pan (as in "one dish wonder") add your chopped zucchini and get them browned up and started, about 3 minutes is all it takes.
 Meanwhile, partially cook your couscous for about 4 minutes, and drain.
 After you get some color on that zucchini, deglaze the pan with about a cup of white wine. Any white wine will due, the only rule is... if you wouldn't drink it, then don't cook with it.
I just added my "house" pino grigio, and it was fine! Now, scrape all those brown bits off the bottom of the pan. The wine will loosen it all up and add flavor.
After you get some color on that zucchini, deglaze the pan with about a cup of white wine. Any white wine will due, the only rule is... if you wouldn't drink it, then don't cook with it.
I just added my "house" pino grigio, and it was fine! Now, scrape all those brown bits off the bottom of the pan. The wine will loosen it all up and add flavor.
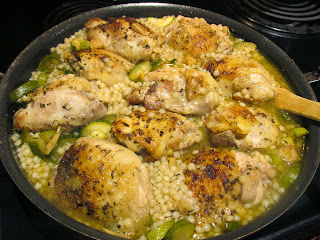
 Then, pop your partially cooked couscous in the pan with the zucchini and cook for about a minute or two, to combine... you know... get the party STARTED!! Add another 2 cups of chicken stock to the pan before adding the chicken thighs back in. This will give us moist, tender, tasty, garlicky chicken, and we will LOVE IT!!
 Last, pop your browned up chicken thighs in the pan! Nestle them right in, snuggling them into the couscous and sauce, and zucchini!
 Now, put on the lid (or top with foil) and pop it all into your 375 degree oven with your roasted garlic! Let it cook covered for 20 minutes.
 I put a cookie sheet under the pan in case I have any spill-over. Now, don't forget about that roasting garlic... it's about to join this chicken party soon, and we will be so happy we invited her!!! After 20-25 minutes, pull both your chicken and your roasting garlic out of the oven.
 The garlic will be beautifully roasted and smell buttery, and garlicky, and delicious. When cool enough to handle, simply squeeze ALL (yup all of 'em) those cloves of garlic into the chicken and couscous.
 I used a fork to help, but if the garlic is cool, they will pop right out when you squeeze them.
 Mix that garlicky goodness with all that couscous and chicken and juices! Now, pop back into the oven, uncovered, for another 10 minutes!
 Now what this needs, is absolutely nothing, just a fork and a plate... but if you want to send it over the top, add a little toasted pine nuts!
 Just a sprinkle, and you have some serious Sunday chicken dinner comfort food, fit for a kid!! Dinner Stevie's way...
 Sunday chicken dinner with all the comforty goodness of roasted garlic and creamy couscous and zucchini! Soooo good!


